Table of Contents
Discover the benefits of Halasana, or Plow Pose, as it promotes flexibility and relaxation. Explore step-by-step instructions to achieve this invigorating yoga posture and experience its positive impact on your mind and body.
Halasana Pose Explained
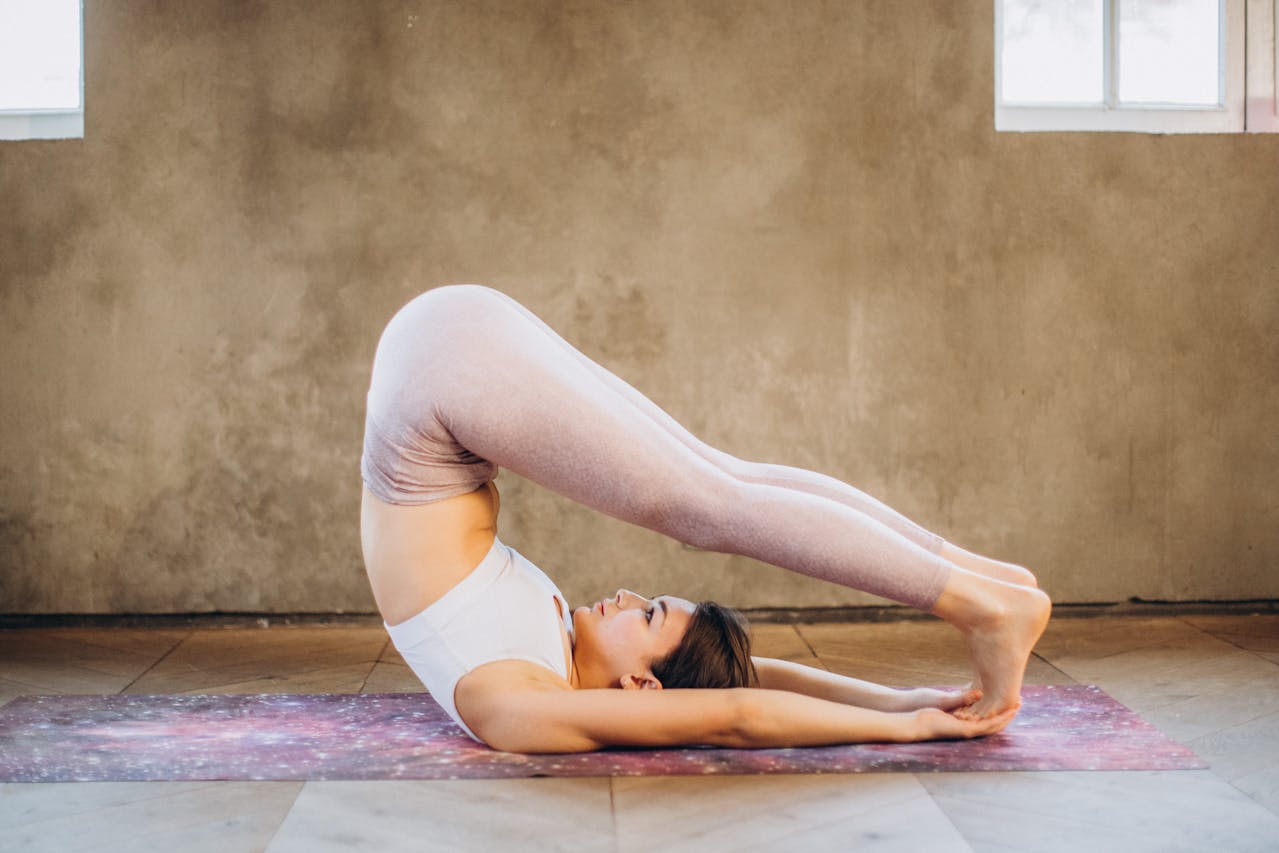
Halasana is an inverted yoga pose that looks a little like a plow. Inverted yoga poses are generally those with the body upside down with the head positioned lower than the heart.
From a supine position, the pose is entered by lifting the legs and hips and touching the toes to the floor behind the head. As a result, the neck, hips and spine are all bent forwards, with the arms reaching back.
Halasana is included in the Ashtanga yoga practice as part of the finishing sequence of yoga asanas. It follows Salamba Sarvangasana (Shoulder stand), and in turn is followed by Karnapidasana (Ear Pressure pose), Urdhva Padmasana (Inverted Lotus), Pindadasana (Embryo posture), Matsyasana (Fish pose), Uttana Padasana (Extended Leg pose), Sirsasana 1 and 2 (Headstand) and Balasana (Child’s Resting pose).
- Sanskrit Name: Hal+Asana
- Translation: Plow + Pose
- Level of the Pose: Intermediate
- Mental Benefits: Cultivates mental calmness and reduces stress, enhancing overall well-being through gentle inversions.
- Physical Benefits: Stimulates the spine, promoting flexibility and alignment. It stretches the shoulders and neck while stimulating the thyroid gland for improved metabolism and energy flow.
- Associated Chakra(s): Primarily activates the Vishuddha (Throat) chakra, encouraging clear communication, and the Ajna (Third Eye) chakra, enhancing intuition and insight.
How to Perform Halasana Pose
Plow Pose Basics
Lying on your back, you can get into a plow pose by lifting your legs and reaching them back to touch your toes to the floor behind your head with your knees straight. In the process, your hips will lift, and your ribcage will angle off the floor towards vertical.
To avoid straining your neck when lifting your legs back up, pre-brace your neck by pressing the back of your head down before lifting your toes or shift your weight back over your shoulders so that your neck remains relaxed when you lift your toes off the floor.
Two common arm position options for plow pose (or plough pose) are to position your hands beside you (before lifting your legs) or to clasp your hands behind your back (after lifting your legs).
Getting into Halasana Plow Pose
To get into halasana in any yoga session, you can start off by lying on your back with your hands on the floor beside you as if in a corpse pose. Lift your legs so that they are vertical.
From there, reach your legs back and use the weight of your legs to help roll your hips off of the floor. Press your hands down against the floor at the same time.
To reach your legs back further, lift your hips gradually higher.
Another option for entering halasana is to bend the knees after lifting your hips. Alternatively, you could have a chair in front of you. Place your feet on the chair and then use your legs to lift your hips off of the ground.
From there, reach one leg back until the other foot becomes light on the chair. From there, lift the other leg.
Then, staying balanced, scissor the legs together while keeping the knees bent. Once your feet are together, you can then work to straighten your knees slowly.
Step-by-Step Guide to Perform Halasana Pose
- Begin by lying on your back, arms resting alongside your body, palms facing down.
- Inhale as you engage your core muscles, lifting your legs over your head until they're perpendicular to the floor.
- Exhale and support your lower back with your hands, keeping your elbows shoulder-width apart on the floor.
- Maintain the position as you gradually lower your legs behind your head, aiming to touch the ground with your feet.
- Breathe evenly as you lengthen your spine, allowing your throat and neck to relax.
- To exit the pose, inhale and lift your legs back over your head, rolling down one vertebra at a time.
- Gently lower your legs to the floor, returning to the starting position.
Exiting Halasana
If you manage to get your feet to the floor or are resting on the edge of a chair, one option is to press your feet down while holding a plow pose actively. As you do this, your hips may move back towards your head so that you can use body weight to help press your feet down.
The trick, then, is exiting the pose without straining your neck.
One option is actively pressing your head into the floor before lifting your feet. This will activate your neck muscles to be ready to take the load when you lift your feet from the floor or chair.
Another option, if you have the required flexibility, is to move your hips forwards, away from your head, before allowing your feet to lift. Once your feet become light on the floor, as a result of shifting your hips forwards, you can lift them without worrying about straining your neck, provided you prevent your hips, and your center of gravity, from shifting back as you lift your feet.
From there, you can slowly roll out of the pose under control by shifting your center of gravity slowly forward.
Beginner Tips
Doing Halasana for the first time
When doing a plow pose for the first time, do it in front of a wall or a chair to help keep your neck safe. Position yourself close enough to the wall or the chair to touch your feet before your hips get too high and, more importantly, before your center of gravity passes beyond your shoulders.
Using Props When Practicing Halasana
If hamstring flexibility is limited, one way to perform halasana in regular practice is to use a chair.
With the chair behind your head, you can place your toes on the chair after reaching your legs up and back.
Another often recommended prop for doing a plow pose is a folded blanket. When using a blanket, you lie with your shoulders and back on the blanket while your head rests directly on the floor.
Using the blanket reduces the amount of forward bend in the neck. This option makes doing a plow pose a lot more comfortable for your neck. Another option is to use both a chair and a blanket.
Common Mistakes When Practicing Halasana Pose
- Rushing into the Pose: Hastily entering the pose can strain your neck and back. Take time to transition smoothly, ensuring your movements are controlled.
- Incorrect Neck Alignment: Allowing your head to bear excessive weight can strain your neck. Keep your neck relaxed and avoid turning your head while in the pose.
- Overarching the Lower Back: Arching your lower back excessively can lead to discomfort. Engage your core to maintain a stable spine and protect your lower back.
- Using Momentum: Swinging your legs into the pose using momentum can compromise alignment. Lift your legs with controlled strength rather than relying on momentum.
- Forcing the Feet to Touch the Ground: Forcing your feet to touch the ground behind you might strain your back. Work on flexibility gradually and avoid pushing beyond your current limits.
- Neglecting Breathing: Holding your breath can hinder the pose's benefits. Maintain steady, deep breaths to enhance relaxation and balance.
- Misplacing Shoulder Support: Incorrect hand placement while supporting your lower back can lead to discomfort. Keep your elbows shoulder-width apart and provide adequate support.
- Overstraining the Hamstrings: Pushing your legs too far can strain your hamstrings. Practice patience and avoid pushing your flexibility limits too quickly.
Contraindications
- Neck Injuries: Individuals with neck injuries, cervical spine issues, or recent surgeries should avoid Halasana as it can strain the neck and exacerbate the condition.
- Back Problems: People with lower back issues, herniated discs, or sciatica should avoid this pose to prevent further strain on the spine.
- High Blood Pressure: Halasana can increase blood pressure in the head, making it unsuitable for those with uncontrolled high blood pressure or hypertension.
- Menstruation: Women during their menstrual cycle should avoid Halasana due to the inverted position and potential discomfort.
- Pregnancy: Pregnant individuals, especially in later stages, should skip Halasana to avoid pressure on the abdomen and potential strain on the fetus.
- Glaucoma: Halasana's inverted position can elevate eye pressure, making it unsuitable for people with glaucoma.
- Detached Retina: Individuals with a history of detached retina should avoid the pose, as the increased pressure in the head may pose risks.
- Osteoporosis: Those with osteoporosis should be cautious with this pose, as the pressure on the neck and spine could increase the risk of fractures.
- Digestive Issues: People with severe digestive issues, such as hernias or gastrointestinal disorders, should avoid Halasana to prevent discomfort or exacerbation.
- Inexperienced Practitioners: Beginners and those who haven't mastered the pose should be cautious, as improper execution can lead to strain and injury.
Consult a healthcare professional or a qualified yoga instructor if you have any concerns or medical conditions before attempting Halasana or any other yoga pose. Always prioritize safety and listen to your body.
How to Deepen the Pose
Using Gravity and Breath to Extend the Stretch
Start by lying on your back with your arms alongside your body, palms facing down. Inhale deeply, engaging your core muscles.
As you exhale, use your core strength to lift your legs over your head. Extend your legs toward the floor behind you, aiming to touch the ground with your feet.
Once your feet touch the floor, continue breathing deeply and evenly. With each exhale, visualize your spine elongating and your legs reaching further away from your head, allowing gravity to deepen the stretch gently.
Maintain this position for several breaths, ensuring you're comfortable and not straining during the halasana stretches. Feel the stretch along your spine and the backs of your legs.
Leg Variations to Increase Flexibility
After entering Halasana, experiment with leg variations to enhance flexibility. Bend your knees slightly and place your feet on the floor behind you. Press your feet into the floor, feeling the stretch along your spine and shoulders.
If you're more advanced, slowly straighten your legs one at a time while maintaining the stretch along your spine. As your hamstrings and lower back gradually release, you can achieve a deeper stretch.
Remember to keep your breathing steady and maintain awareness of your body's sensations.
Supported Halasana with Props
For those working on flexibility or dealing with limitations, using props can aid in deepening the pose safely.
Place a folded blanket or bolster under your shoulders before lifting your legs over your head. This supports and reduces the angle of your neck and shoulders, making the pose more accessible.
Once in the pose, focus on elongating your spine and breathing deeply. The prop allows you to experience the benefits of the stretch without excessive strain.
Over time, you can gradually reduce the height of the prop as you gain flexibility and confidence in the pose.
Deepening any yoga pose, including Halasana, requires patience, consistent practice, and listening to your body's signals. Never push yourself too far, and ease out of the pose if you experience pain or discomfort.
It's always a good idea to consult a qualified yoga instructor or healthcare professional if you're unsure about your practice.
References
Anatomical exploration of Halasana | Journal of Ayurveda and Integrated Medical Sciences
EFFECT OF YOGASANA PRACTICE ON SYSTOLIC TIME INTERVALS - PMC
(PDF) Stress Management Intervention Strategy through Rational thinking and Yoga
Effects of yogic practices on physical variable among school level handball players
Effects of yogic exercises on lean body mass
Halasana in the Hospital: Yoga to be Offered to NHS Staff - The Minded Institute
Disclaimer
The contents of this article are provided for informational purposes only and are not intended to substitute for professional medical advice, diagnosis, or treatment. It is always recommended to consult with a qualified healthcare provider before making any health-related changes or if you have any questions or concerns about your health. Anahana is not liable for any errors, omissions, or consequences that may occur from using the information provided.
By: Anahana
The Anahana team of researchers, writers, topic experts, and computer scientists come together worldwide to create educational and practical wellbeing articles, courses, and technology. Experienced professionals in mental and physical health, meditation, yoga, pilates, and many other fields collaborate to make complex topics easy to understand. Anahana is also home to specialists in crystals, tarot, angel numbers, astrology, life path numbers, zodiac signs, and horoscopes. By combining evidence-based wellness with spiritual and energetic practices, the team offers clear, trustworthy guidance for both mind-body health and modern spirituality.