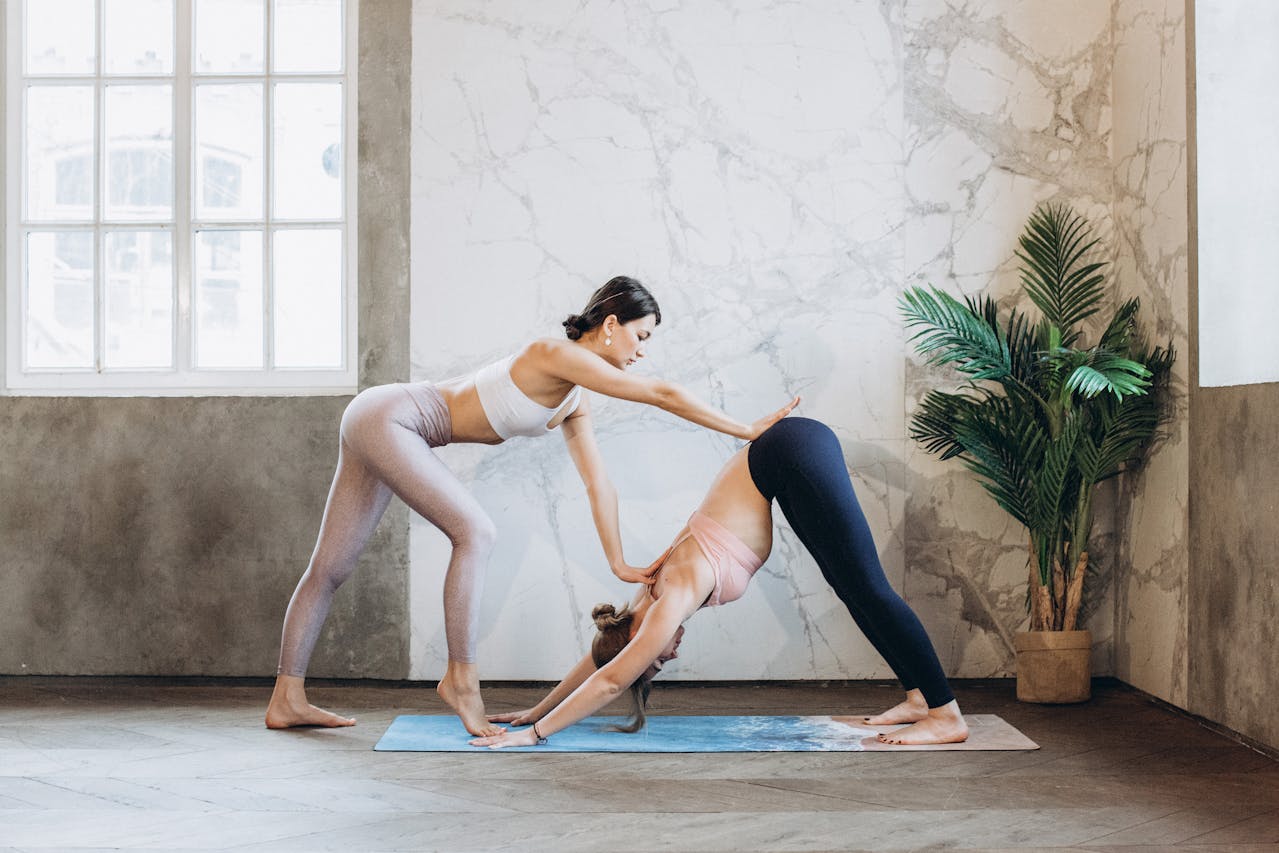
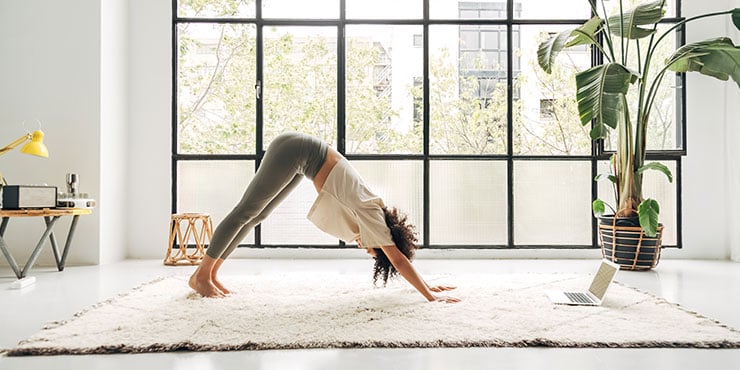
Adho Mukha Svanasana, also known as the downward-facing dog pose, is a popular yoga posture that resembles an inverted V-shape. It is a great pose to stretch and strengthen the entire body, especially the arms, shoulders, hamstrings, and calves.
Introducing Adho Mukha Svanasana
Adho Mukha Svanasana, often known as downward-facing dog, is a standing yoga pose that improves balance, flexibility, and strength. It is one of the preparatory poses and is in most variations of Surya Namaskar and sun salutations. The posture starts with the practitioner on their knees and hands, shoulder-width apart. When prepared, the practitioner pushes their hips back and up. With weight evenly distributed between the hands and feet, practitioners aim to keep their arms in line with the entire body.
Sanskrit Breakdown of Adho Mukha Svanasana,
The term downward-facing dog comes from the similarities of the pose to how a dog stretches. The English translation of Adho Mukha Svanasana is as follows.
- Adho – downward,
- Mukha – face or facing,
- Svana – dog.
Because this pose positions the head lower than the hips, it is a form of an inverted pose or inversion posture. Depending on the context, Adho Mukha Svanasana is also a resting pose and transitional pose.
Step-by-Step Instructions for Adho Mukha Svanasana
While Adho Mukha Svanasana is a part of most classes in yoga, many people enjoy practicing the posture independently. Practitioners can begin on all fours (hands and knees) when practicing the pose outside of sun salutations.
Part 1: Focusing on the arms and upper body
Push the hips back and up so that the arms are in line with the spine when viewed from the side. Reposition the legs so that the knees are beneath the hips.
One trick to help activate the arms and inner legs is to press the hands forward against the floor. Resist this forward push by pushing the feet firmly into the floor.
Hold the activated position for several breaths before relaxing slowly and smoothly. Optionally, one can activate while inhaling and relax while exhaling, or vice versa if that feels more natural.
Part 2: Keeping the arms and legs active with knees lifted
When the position feels comfortable, try to maintain it while lifting the knees. Push the hips back after pushing off the floor with the hands and feet. From there, lift the knees, maintain the hips pushed back, and keep the arms in line with the spine.
Don’t worry about straightening the knees. Instead, work to maintain the activation in the arms and legs and push the hips back and up.
Part 3: Finding alignment
Try moving the shoulders slightly upwards and then downwards relative to the ground. Notice the sensation in the arms, shoulders, and ribcage, and find the position where it feels most like the arms and torso are in line. Look for a position that maximizes the distance between the hands and hips.
Rest for a few moments, optionally in a kneel or child’s pose.
Part 4: Straightening the knees while keeping the heels lifted
For the next phase, repeat the sequence of steps learned so far - add tension to the arms and feet, push the sit bones back, then lift the knees. Align the hips, shoulders, and hands, straighten the knees, and lift slightly into the balls of the feet.
Maintain the arm and leg tension while keeping a neutral spine. From there, focus on making the legs feel long. Even with the heels lifted, one can focus on pushing their hips back and up, away from their hands. When focusing on the legs, keep the backward push on the sitting bones and use the legs to increase the height of the hips. For a deep stretch, draw the inner groin deep into the pelvic floor, engage the core muscles, lift actively from the inner heels, and lengthen the inner ankles toward the floor.
Here one can work with their breath. Try relaxing with each exhale, and activate while inhaling, smoothly and slowly relaxing.
Part 5: Sinking the heels
Repeating all of the above, one may work toward sinking their heels. As mentioned, focus on pulling their forefeet up. It may be helpful to rotate the legs relative to the feet. In particular, one may find rotating their legs inwards makes it easier to pull up on the forefeet.
Another option is to emphasize pulling up the outer part of the feet that correspond with the outer two toes. If one finds this technique helpful, work at reducing the amount of internal shin rotation.
Entering Adho Mukha Svanasana During Surya Namaskar
Adho Mukha Svanasana is found in different styles of Surya Namaskar and ashtanga yoga poses. Depending on the particular style, the pose can transition from an upward dog, low lunge, or cobra pose.
Entering Downward Dog Pose from Upward Dog
During ashtanga yoga practice, Surya Namaskar, and sun salutations, down dog pose initiates after Urdhva Mukha Svanasana or upward facing dog.
From the upward dog posture, tuck the toes under, then push the shoulders back and down while pushing the hips back and up. It may be easier to tuck the toes first, but feel free to experiment.
Getting Into Downward Facing Dog Pose from Ashwa Sanchalasana
In other types of Surya Namaskara, one can enter Adho Mukha Svanasana downward facing dog from the low lunge pose Ashwa Sanchalasana. Ashwa Sanchalasana is a lunge with the back knee bent and on the floor and both hands also on the floor.
From Ashwa Sanchalasana, practitioners can enter downward dog by stepping their front foot back. With straight legs, push the shoulders back and down, lift the hips, and sink the heels.
Entering Downward Facing Dog Pose from Bhujangasana
One may enter the yoga pose from Bhujangasana or cobra pose. This is similar to the upward dog pose but with the elbows bent.
From Bhujangasana, one can have a slight bend in their knees, press their feet into the floor, lift their hips, push their ribcage back, and straighten their elbows. From there, tuck the toes, lift the knees, and straighten the legs.
The Benefits of Adho Mukha Svanasana
 Adho Mukha Svanasana benefits include stretching the calf muscles and hamstrings, strengthening the arms and legs, improving posture, and relieving stress. Consistent practice also helps to create space in the chest and abdomen, allowing for better breath control.
Downward dog pose is an inversion because the head is lower than the pelvis, which can help the body get used to being upside down. It benefits the chakra energy system by activating and bringing balance to the Heart Chakra for love, Throat Chakra for communication, and Third Eye Chakra for spiritual connection.
Some additional benefits include:
-
Improves posture: When practitioners practice lengthening their spine, this will increase the strength of the spinal column and help improve overall posture.
-
Supports endurance and stamina: Downward dog helps strengthen intercostals (the muscles between the ribs) and scapular stabilizers (e.g., trapezius, levator scapulae, and serratus anterior) to improve stamina.
-
Increases energy: The inversion energizes the body with a free flow of energy and nerve information to the brain.
-
Strengthens the upper and lower body: Stabilizing the spine and ribcage includes activating the lower back muscles. This includes the quadratus lumborum and the array of spinal erector muscles that cross and act on the lumbar spine, sacrum, and SI joints.
-
Increases shoulder and hamstring flexibility: The full body stretch reaches the chest toward the floor in front of the feet, improving shoulder flexibility and deepening the hamstring stretch.
-
Improves circulation: In downward dog, the head is lower than the heart, so it has the benefits of inversions and improves the blood flow through the body
Contraindications for Adho Mukha Svanasana
Some of the contraindications for downward-facing dog include, but are not limited to, injuries or any pain in the wrists, shoulders, lower back, and neck. People with high blood pressure should perform this pose under the guidance of an experienced yoga teacher or medical practitioner.
Practitioners with the following conditions should avoid this pose:
- Carpal tunnel syndrome
- High blood pressure
- Blood circulation issues.
Pregnant women should consult medical specialists before performing this asana.
Working Through Physical Challenges
Shoulder and Hamstring Tightness
Practitioners with tight hamstrings or stiff shoulders might find it challenging to perform the full version of Adho Mukha Svanasana. Still, there are methods for those with tight hamstrings to perform this asana efficiently:
- Practice Adho Mukha Svanasana with knees slightly bent and focus on the correct body alignment
- Work toward straightening the knees with the heels slightly off the ground
- Practice pushing the heels down while focusing on lifting the balls of the feet
When first performing downward-facing dog, yoga practitioners should warm up their shoulders. Starting on the hands and knees, practice moving the whole body back into a downward-facing dog (still on the knees) and then forward to the starting position (shoulders over wrists). Work at doing this smoothly and slowly, practicing shoulder blade and ribcage control. Those with stiff shoulders might benefit from practicing ribcage mobility and scapular awareness exercises before performing downward-facing dog.
People make two common mistakes when performing Adho Mukha Svanasana – sagging at the shoulders and turning the feet out to get the heels to touch the floor. Practitioners should focus on using the arms to push the body back actively and pull up on the fronts of the feet to avoid making these mistakes.
Slipping in Downward Facing Dog
Because Adho Mukha Svanasana is an all-fours pose with the center of gravity between the hands and feet, it’s common for people to find their palms and feet slipping while performing the yoga asana. One option is to try the posture on a cement floor. If a yoga mat is dirty, one may find cleaning it helps. Other surfaces that may offer better grip include linoleum and other artificial floors. Remove socks to prevent further slipping.
Correct Alignment for the Shoulder Blades and Collar Bones
As one gets more practice with Adho Mukha Svanasana, it may help to pay some attention to the shoulders and collar bones. Because the arms are equivalent to an overhead position in this yoga pose, the shoulder blades or scapulae should sit so that the upper arm bones (the humeri) clear the acromion process.
Controlling the Scapulae in Adho Mukha Svanasana
The acromion process is the bony projection one feels at the top of the shoulder. It provides an attachment point for the middle fibers of the trapezius and deltoid muscles.
Just below the acromion process is a finger of bone that projects under the collar bone. It’s called the coracoid process or crow’s beak. This provides an attachment point for the pectoralis minor, coracobrachialis, and biceps brachii muscles.
Whenever lifting the outer arms over the head, the scapular stabilizers move the scapula relative to the spine and ribcage so that the arm bones have clearance relative to the acromion process.
The middle and upper trapezius pull up and in on the acromion process. Meanwhile, the serratus anterior muscle can pull out on the shoulder blade's bottom tip while the trapezius's lower fibers pull down on the inner edge of the scapula.
For all these muscles to work correctly and effectively, it can help lengthen the back of the neck and make the ribcage active. One can activate their ribcage by engaging the spinal erectors, costal muscles (the muscles between the ribs), and the abdominal obliques.
Focus on spreading the shoulder blades, in which case one may find it more comfortable to actively create a downward pull on the fronts of their ribs. This then anchors the serratus anterior and pectoralis minor.
When spreading the shoulder blades with the arms overhead, focus on spreading the shoulders while creating a downward pull.
Try focusing on retracting the shoulder blades, in which case one might find it more appropriate to create an upwards lift (towards the chin) on the front ribs while simultaneously creating a downward pull on the back ribs. In either case, to maximize the inward movement of the acromion processes, focus on moving the shoulders up towards the ears.
Using the Upper Arm and Forearm Muscles in Adho Mukha Svanasana
An important aspect of controlling the shoulders, particularly with the arms overhead, is using the arm muscles. As mentioned, the coracobrachialis and the biceps femoris short head both attach to the scapulae via the coracoid process. The long head of the triceps muscle attaches to the scapula just below the shoulder joint. If one stiffens or activates their elbows stabilizing them against internal rotation, one can help to anchor these muscles, which can help to stabilize their scapula. This can make it easier for muscles that control the shoulder joints to stabilize and further fine-tune the position of the shoulders.
Since many of the forearm muscles cross the elbow and wrist joints, one may find it helps to make their forearms active. A good starting point for this is to spread the fingers and make them feel long. From there, adjust the elbow rotation relative to the hands.
One can practice this by starting off on all fours. Activate the hands and forearms and push the ribcage away from the floor to spread the shoulder blades and create tension in the upper arms and shoulders. From there, push the hands forwards and the feet back. Lengthen the back of the neck by moving the head up and away from the ribcage.
Moving the hips back, as the shoulder angle changes, one may find that their elbows automatically rotate, helping maintain arm tension. As one gets into the position, they may find that they can fine-tune elbow rotation so that the shoulders feel comfortable.
Using the Hip Flexors in Adho Mukha Svanasana
While many people think of the psoas and iliacus as hip flexors, hip flexors also include the tensor fascia latae and the sartorius - both of which attach to the front point of the hip bones (the ASICs). These muscles also connect to the tibia, just below the knee joint line. These muscles are helpful in creating a backward pull on the hip bones.
One way to achieve this is to reverse the push and pull of the feet and hands once the practitioner is in downward-facing dog. Create a backward pull on the floor with the hands and a forward pull on the floor with the feet. One can do this with knees straight or bent. In all cases (knees bent or straight), work at activating the knees.
Keeping the knees active will help anchor the sartorius and tensor fascia latae so they can use them effectively to create a rearward pull on the hips.
References
Downward-Facing Dog: How to Practice Adho Mukha Svanasana
Downward-facing dog - Slide show: Yoga poses
Downward-Facing Dog - Well Activity - The New York Times
Disclaimer
The contents of this article are provided for informational purposes only and are not intended to substitute for professional medical advice, diagnosis, or treatment. It is always recommended to consult with a qualified healthcare provider before making any health-related changes or if you have any questions or concerns about your health. Anahana is not liable for any errors, omissions, or consequences that may occur from using the information provided.